FELT PAINTING: CONCEPT TO CREATION
“GIFT OF THE DAY”
“Yesterday is history. Tomorrow is a mystery. Today is a gift. That’s why we call it ‘The Present’ – Eleanor Roosevelt”
I have subscribed to these inspirational thoughts for several years now as I have come to believe what I think, so I shall become. I have adopted Eleanor Roosevelt’s words as a foundation for my life and five year plan and also as the foundation of this felted painting. The concept has been developing for quite a while. I can never hurry along any creative activity; especially when it comes to making felted paintings. Fellow artists will know that you can’t just knock out art. Art must evolve from the heart and mind through the hands.
The embroidery elements are really the “icing on the cake” in what I create. Felting is probably the oldest form of fabric production in the world. I find solace in the reality that in this day and age, felting exists and is cherished as a form of expression. Felting is rhythmic and addictive.
My dry needle felting “instruments of torture” as I humorously call them, are a cluster of barbed needles held together by a handle of some type. I have a few varieties of these. I also wear leather finger ends on both my thumb and index finger as a protective device when stabbing dry Merino tops into a felt painting. I have heard too many stories of dry needle felters stabbing themselves with these extremely sharp needles. All the wet felting occurs before I make a start on the time consuming dry needle felting, free form hand embroidery and bead embroidery embellishments.
I used several photographs of an extremely lurid sky at the end of the day during our last big 11 year drought. The sky was different shades of blue with a massive Italian pink and golden hued cloud dominating part of the sky where a much hoped for thunderstorm was developing over some lucky person’s property. I snapped a few shots and I have never forgotten what the sky can look like during a drought. I also added a house into this painting concept. In dream analysis, the house is a symbol of self and I have increasingly added a structure to my felt paintings as a way of communicating my current situation in life. All my paintings contain hidden existential elements. Art is more than eye candy. Art is a secret discourse that communicates to fellow creative cognoscienti.
In essence, the creation of a felt painting is no different to my pastel painting. The principles of colour, form and texture are pretty much the same in both media. I also use the principles of working from dark to light in felt paintings just like I do with my pastel work. I think it is only by looking at the dark that we are able to see and appreciate the light; much like life, is it not?
I usually allow for up to 30% shrinkage in my paintings so the bubble wrap I begin with both underneath and over the top of the felt painting is larger in size than the fibres I lay out. I have a purpose built high set felting table my husband Jonathan kindly made me. If you don’t have access to such a beast, one of those low cost fold-up tables from the hardware store are ideal. I started off with one of these. The table height should ideally be set at your hip height so you are not bending over the tedious hand rolling as the bending can cause you back and shoulder ache. An easy way around this is to purchase a length of plumber’s poly pipe that will fit over the table legs and then stopper the bottom of the poly pipe with some chair leg rubber. The poly pipe will most probably only come half way up the table legs due to the cross member framework underneath. Take this into consideration before cutting the poly pipe. Pop on the rubber table leg stoppers. Slip on the poly pipe extensions onto the table legs and you have a custom height table. When not in use, simply remove the poly pipe additions, fold up the table and store away. This is the cheapest way of creating a custom built felting table to suit your hip height.
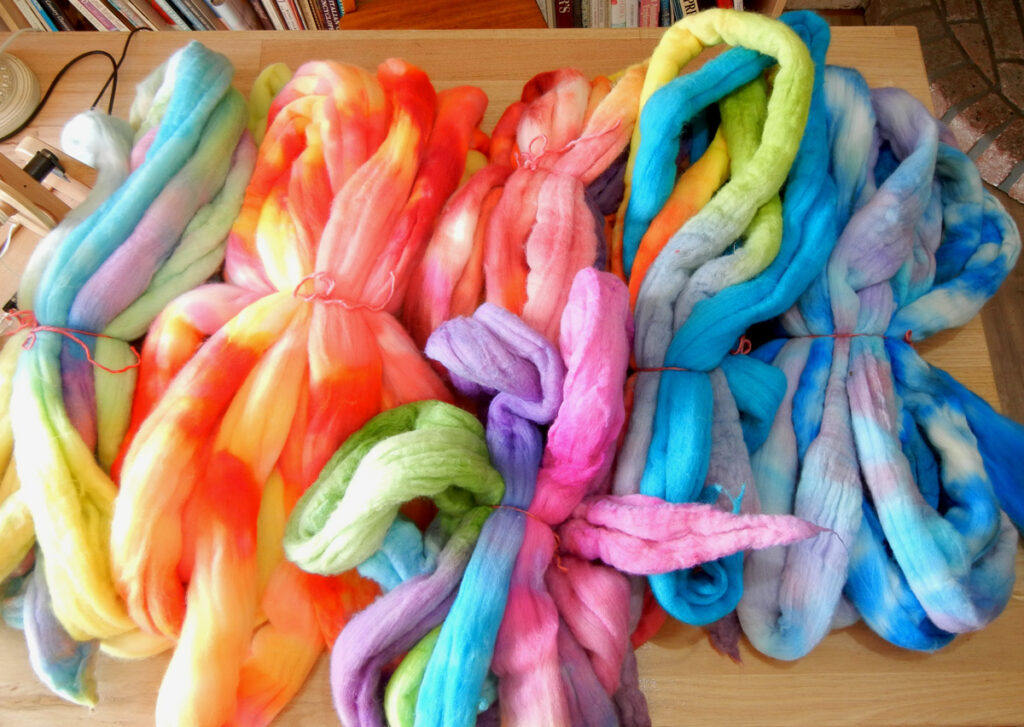
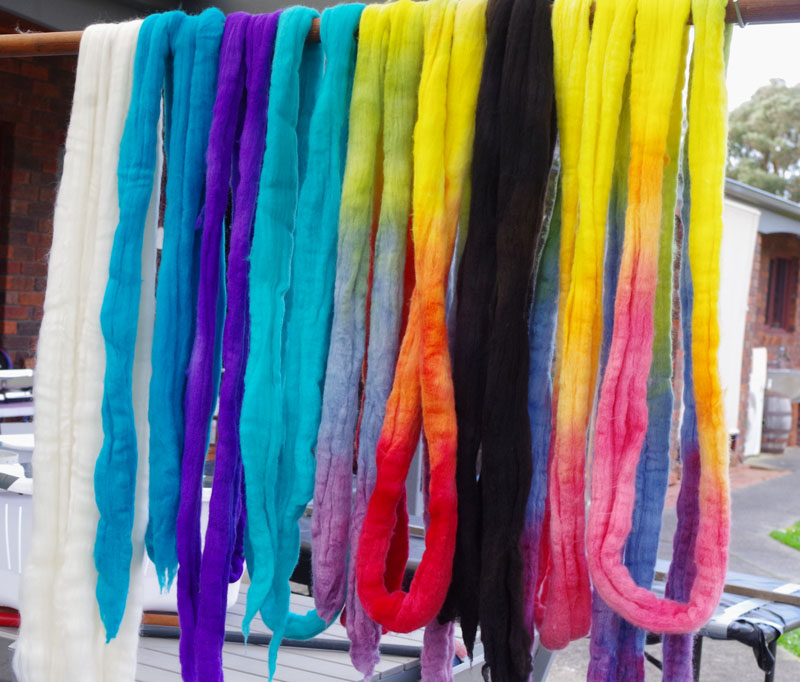
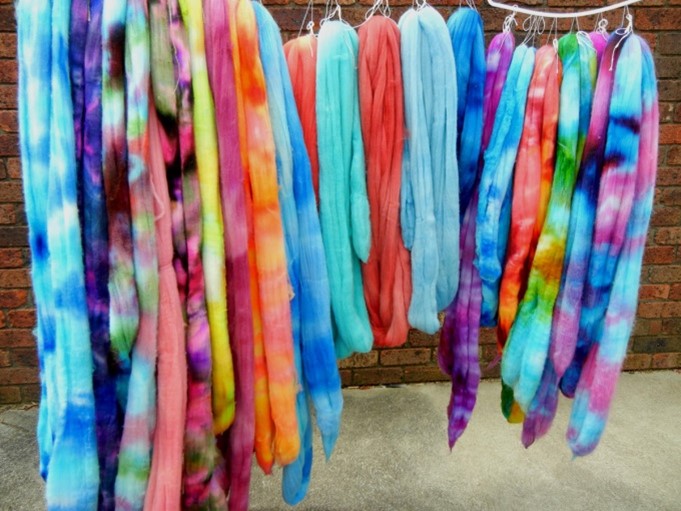
Every summer, I hand dye quality Australian Merino tops into custom shades that I will use throughout the year. Any dyed wool that is not used in my beloved felt paintings is hand spun and put up for sale, mostly on Etsy (Sheep Shed Yarns). I also put some of these lovely hand dyed lengths for sale here on my website so you can hand spin yourself or use the colourways in your own felted creations or even in weaving as one of my buyers does. I only use quality archival dyes as product integrity is everything.

All felters have their own techniques in their craft. This is my own as I am self-taught through the school of hard knocks and a lot of continual experimentation. The process works for me and may for you too.
Ingredients for “Gift of the Day”:
General Felting “Tools”:
- Two lengths of bubble wrap, larger than your intended painting;
- A couple of old towels;
- 1/3 bucket of water (barely warm);
- 2 tablespoons dishwashing liquid added to the water;
- Ball brauser (or an old bottle with holes punched in the lid will do at a pinch);
- A spare small towel or sponge for cleaning up any water drips;
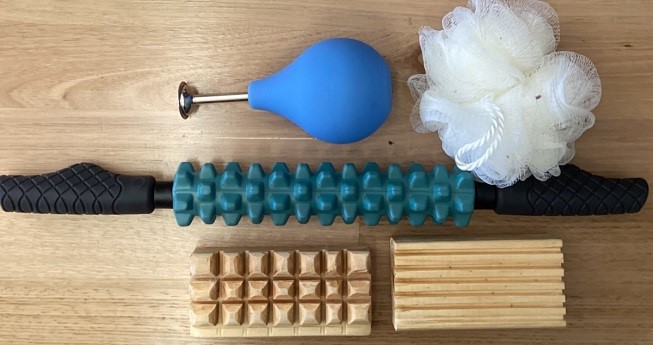
- A length of pool noodle or heavy cardboard roll;
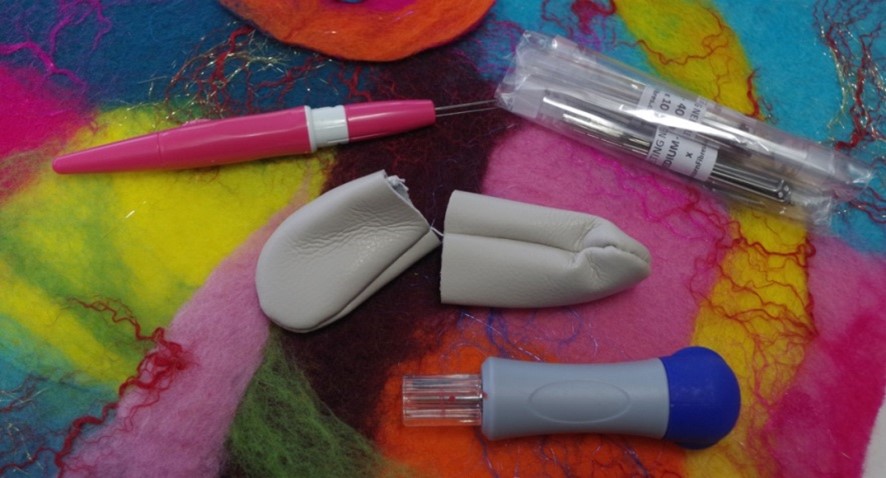
- A piece of fly wire mesh from the hardware store, a tad larger than the starting size of your painting;
- A wooden or rubber massager roller (see the photo – available in discount stores);
- A shower scrunchie;
- 3 lengths of stocking (for use as ties);
- A pair of tweezers for manipulating any bits of wool that has moved out of place
- Optional: Dry needle felting tools for any felting embellishment you wish to add when the felted painting is complete and ready to work on.
- A spare clean fly screen for setting up on bricks (used to dry the felt flat)
- Optional: A plastic drum style washing machine/spinner – sold in caravanning stores.
The Fibres: (Substitutes most welcome!)
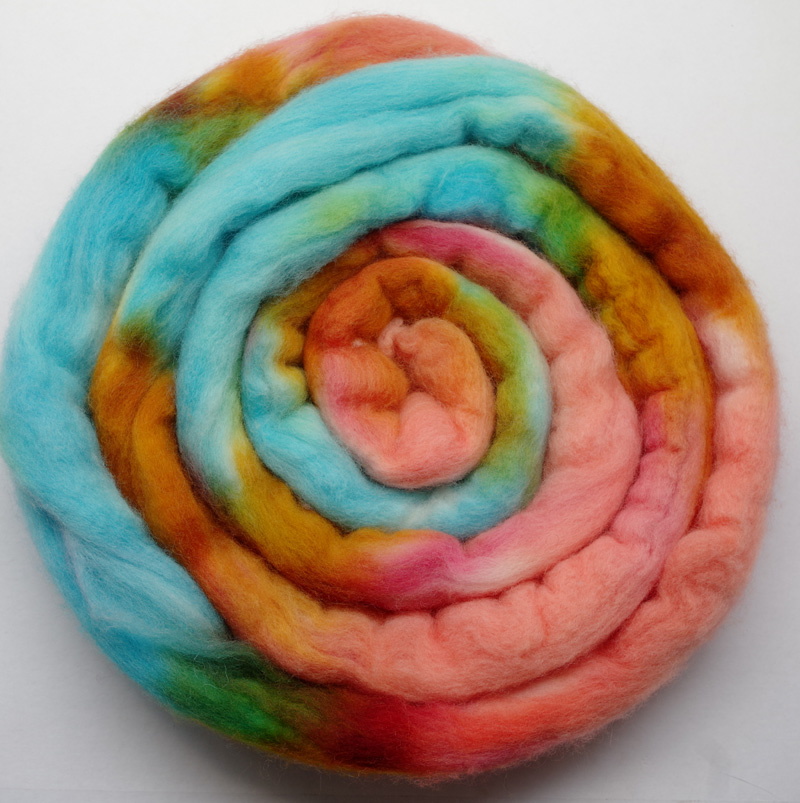
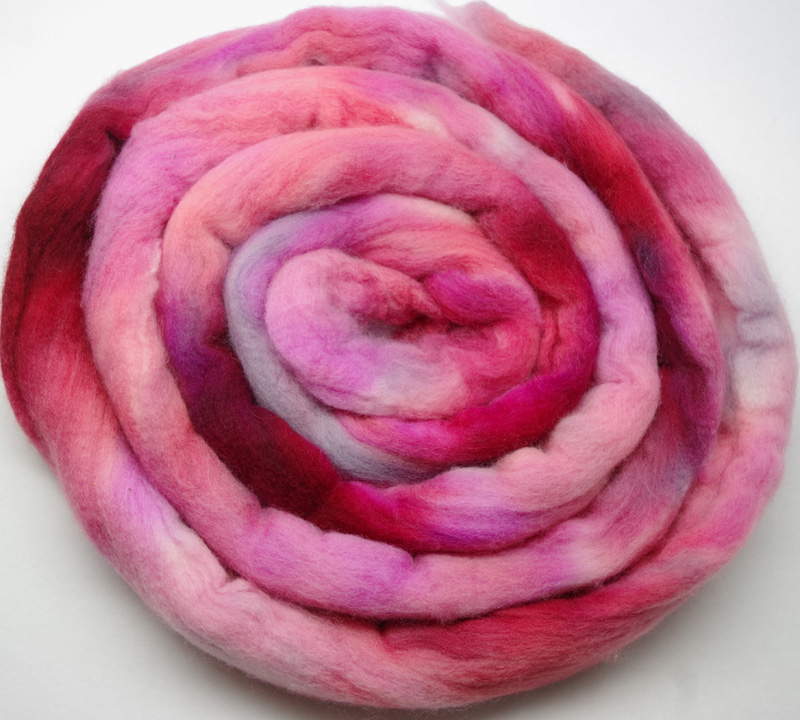
- Hand dyed 19 micron Merino tops. Shades in this painting range from sunset orange, pinks, blues, greens, yellows and earth colours;
- Hand dyed Masham locks (the “curly” locks you see on this initial layout). You can also use hand dyed Leicester locks;
- Hand dyed silk throwster’s waste (green shades);
- Angelina fibre ( blue and green shades);
- Turquoise blue viscose (optional) – a scant amount for the sky;
- Solid colour embroidery floss;
- Metallic embroidery floss;
- Variegated embroidery floss;
- Japanese seed beads;
- Crystal bicones;
- Non metallic Hematite beads;
- A few tiny flat coin shaped glass beads (optional but adds sparkle);
- Other small flat beads of your choice (optional);
- Fusible (iron on) fabric stabiliser;
- A large eyed embroidery needle (big enough to accommodate 6 strand floss);
- A fine beading needle;
- A quantity of “Smoke” coloured 4lb strain Berkley brand “Fire Line” fishing filament (available in fishing/camping stores). Use this thread for the bead embroidery;
- Sharp scissors.
The Layout:
Lay out an old towel on your work table. Lay over a length of bubble wrap with the bubbles facing down. Work out the rough finished size of your painting. Draw a texta frame that is the finished size of your work on the back of the bubble wrap. Next draw another “outer” frame that is 30% larger than the proposed finished size. The painting will shrink with the felting process so allow for up to 30% larger border when laying out the wool. Flip the smooth bubble wrap over so that the bubbles are now facing upwards. Drawing the texta frame size on the underneath side of the bubble wrap will stop it washing away during the felting process.
Pinch off a little amount of dyed top and lay the tufts in a top down (vertical) manner on the bubble wrap. I pinch tufts out by grabbing the end of the top with my hand and curling my four fingers to the palm of my hand and gently tugging at the end of the top, ending up with a nice fan of fibre sitting on my palm. Start at the top of the painting plan and work across the row from left to right or right to left if you are a leftie like me. Add a second row of tufts so they overlap the first row. Keep adding lines of tufts across the work area, making sure the tufts are set in a vertical (top/down) fashion. The tufts will look like roof shingles. Once you have laid down the base row of tops, gently press the tufts onto the bubble wrap. The second layer of top is added in a horizontal fashion across the painting. That is, the second layer tufts are laid down across the work area as you make your way down from the top to the bottom. Always make sure you lay down each layer of tufts in opposite directions from the previous layer. I usually lay down two generous layers for my paintings but some people lay down three or even four layers. I always end up with a horizontal layer as the final layer. Keep the painting sides as straight as possible by referring to the texta markings on the back side of the bubble wrap. Make sure the shingle tufts come out to the outer texta mark. Now, press down gently as in the first layer and look out for any thin parts. Add more tufts as needed to ensure a good, even layer; paying particular attention to the edges. Do not stint on this part of the felting preparation.
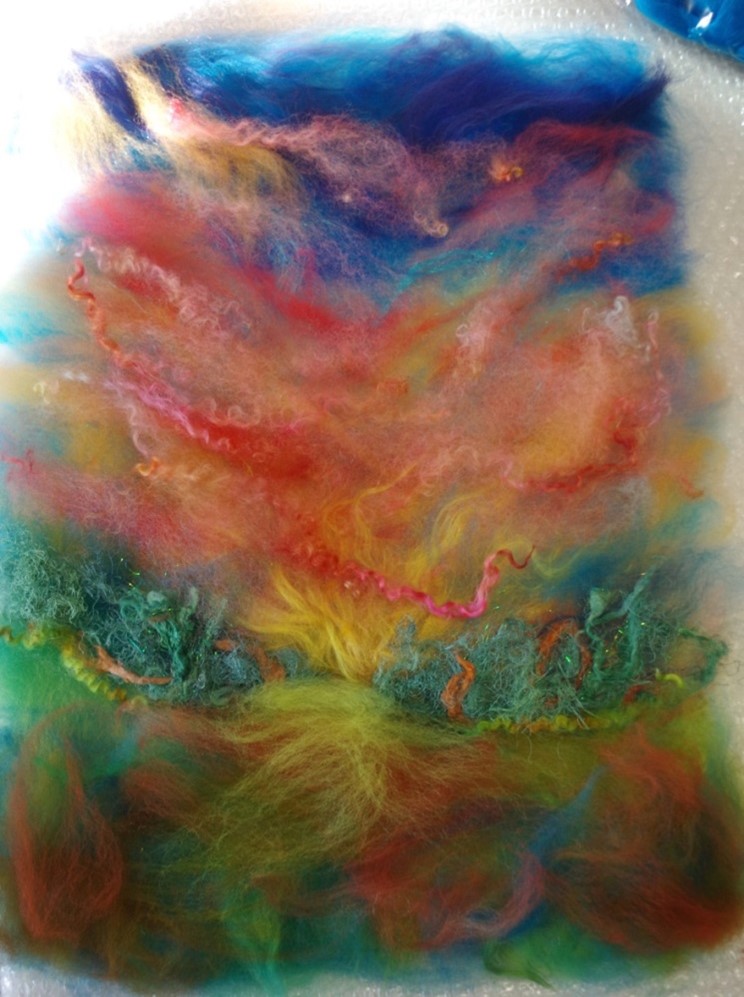
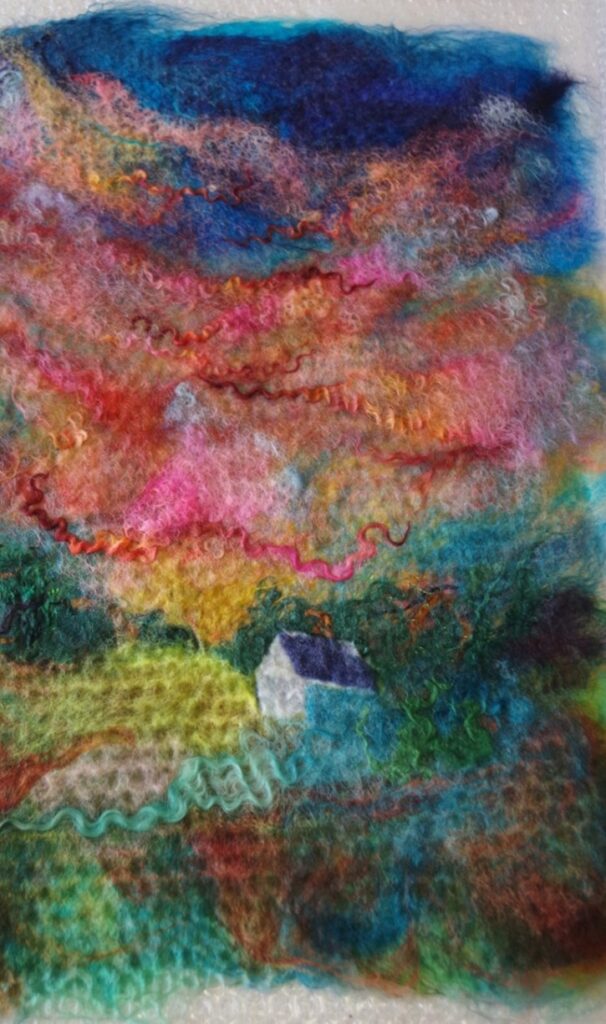
In the example here, I have laid out two layers of tops; the first layer is vertical and the second layer is horizontal. I have begun adding more “colour work” here on the two base layers as this is where the painting starts to come alive in terms of colour, form, texture and subject matter. I have laid out wispy layers of colour here and there throughout the sky and into the paddock down below. The different colours add depth to the painting. A very light hand is called for when laying down elements of the painting as you want to see some of the background colours pop through in places. This is what will give your painting a lot of colour interest and depth when complete. I have also added in some hand dyed Masham wool locks in the sky. The green fuzzy belt on both sides of the painting is a couple of layers of hand dyed silk throwster’s waste. Throwster’s waste makes excellent bushes and trees in paintings as it shrinks during the felting process to add texture to your work. I also add finely snipped Angelina fibre to parts of the sky and in the silk throwster’s waste bushes and then cover the Angelina snippets with an ever so fine layer of wool to capture the Angelina in the finished painting. This will give the sky and bushes some subtle sparkle. Notice how the central part of the painting has warm yellow tones? I have carried out the warm tones down below the central horizon line to suggest a setting sun that is colouring up the late in the day sky. This area will end up being the focal point of the painting. I have achieved depth of field by adding a lighter yellow green in the central distant part of the painting, compared to the spray of yellow that is fanning out from that area. Distance in paintings is always lighter than foreground colours. This is the same principle I use in my pastel paintings. Keep adding wisps of colour throughout to bring the scene to life. Remember if at any time you are not happy with colour placement; use the tweezers to gently extract the offending tuft and fiddle about until you are happy. I have added some thin strands of turquoise blue viscose in parts of the sky. The viscose will fracture beautifully during the felting process.
This part of the painting preparation may take up to a week for me personally as I constantly add and fiddle with colours and colour placement throughout this time to ensure I am really happy with the painting potential that is slowly emerging. Do not hurry wool placement and do not add large blobs of the same colour either. The painting must have depth.
My Process:
Fill up approximately 1/3 full bucket of barely warm water and add 2 tablespoons of dishwashing liquid. Cover the painting with a layer of fly screen. Carefully dribble over the warm soapy water with the ball brauser and gently flatten all the wool right down with the shower scrunchie dipped in the soapy bucket water. As you press down on the wet wool, feel for any puffy dry spots and add a little soapy water to these. The fly screen will stop wool moving about. Start the scrunchie work from the centre of the painting, working your way out to the margins. The painting must be wet throughout but not so soaking wet that water pours out the sides and onto the floor. Dip the scrunchie in the soapy water and shake out most of the water. Do not rub the scrunchie across the fly screen as this will dislodge your entire precious layout. Press gently.
Carefully and slowly peel back the fly screen and put aside. You may have to press down on the wet painting as you peel back the fly screen as it has a tendency to grab along the edges. Once the painting is wet and really flattened down, check over for any wool that has moved out of its intended place. Fix any problems. Once again, fill in any thin parts of the “canvas” with wisps of colour to suit. The background must be pretty even throughout, depth wise.
I have added a little cottage here and more hand dyed Mashan locks to represent garden beds flowing from the high set cottage. There are wisps of more colours added here and there.
Carefully place the top sheet of bubble wrap over the painting with the bubbles facing down onto the painting. Wet your hands with some soapy water and start the very gentle massaging process on top of the bubble wrap to get that soapy water moving around within the painting to ensure the wool is starting to set. I usually massage for around 5 minutes in a gentle circular motion. Once the massaging process is completed, check the painting again to ensure no wool has moved out of place. I then turn to either the rectangular home-made wooden felting tools my husband made with a simple circular saw and rasp or I will use the rubber massage roller. In this instance, I created this painting with the rubber massage roller starting from the bottom of the painting and rolling to the top and back again. One roll up and back again counts as one shot. I will do this for around 30 rolls (30 up and 30 back) and then turn the painting by 90 degrees and repeat. The process at this stage is simple – 30 rolls with the massager tool and turn the painting by 90 degrees. Repeat on all four sides – total of 120 rollings. Flip the painting over and repeat on the back side with 30 rolls on each side of the back part (120 rollings on all four sides). I’d say I press down as hard as if I was rolling out pastry for a pie. In all, the painting is rolled with the massager roller 30 times from each side and then turned over and the back done the same. That is, a total of 120 rollings on the front and 120 rollings on the back.
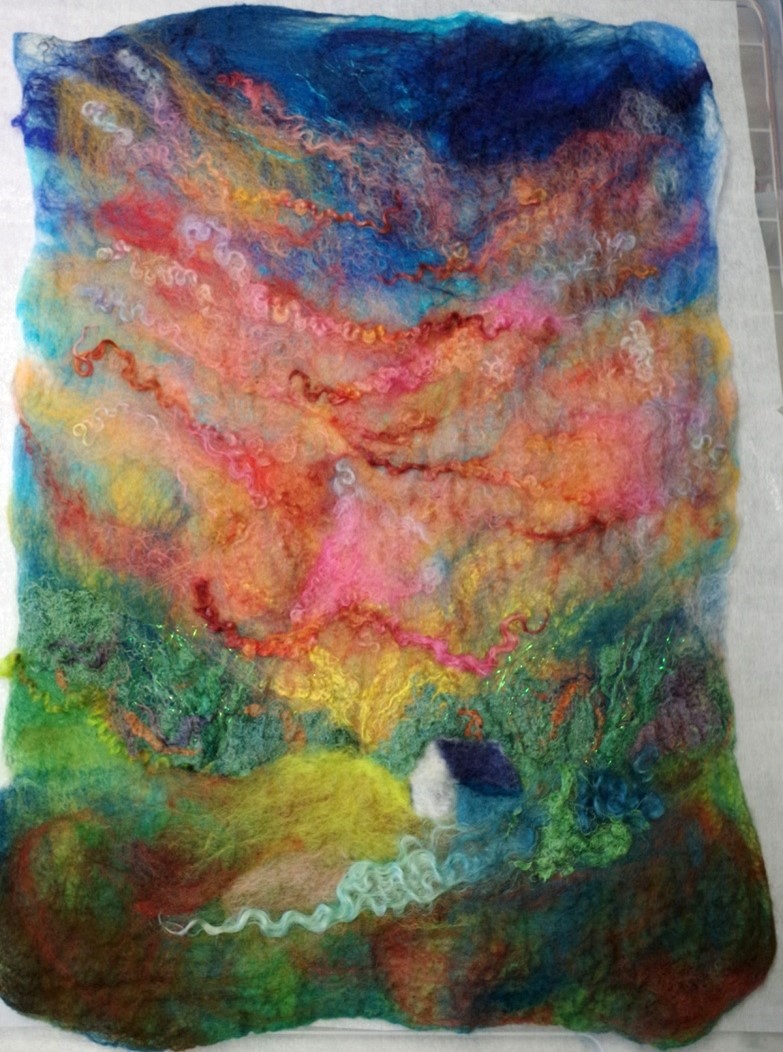
Flip the painting over so it is facing up. Peel back the bubble wrap top layer and check over the painting. Have any subject elements moved around out of place? Fix these now with the tweezers and replace the top layer of bubble wrap. You can see in this image that the bubble wrap has made lots of little indentations in the painting. Don’t worry; these corrugations will disappear with more work. This is what the painting looked like after the massager roller session.
Jellyroll Sessions:
Keep the painting within the bubble wrap sandwich. Place the pool noodle on the bottom part of the painting. Gently and loosely roll up the painting. Place the jellyroll on top of a towel and gently roll the painting into the towel. Do not roll tightly as this will cause unwanted folds and wrinkles in your work. Aim for a gentle “floppy” roll to start with. Tie up each end and in the middle with the cut down stocking legs. Make a shoelace style bow so it can easily be untied.
Bring the big jellyroll close to you and gently roll it forwards and backwards for a total of 50 times. Roll from your wrists to half way up your forearms and back again to your wrists. This counts as one roll. Do not bend over. Keep your legs apart slightly and just relax your shoulders. After 50 rolls, undo the stocking ties and gently unroll the painting. Turn the painting around by 90 degrees. Re-roll the painting and towel and tie up again. Roll a further 50 times.
Repeat the rolling and turning process until the painting has been rolled 50 times from each side in the same manner as you did with the massager roller. This makes for 200 rollings. Check the painting. Flip the bubble wrap sandwich over so the painting is facing down. Re-roll the painting and towel around the pool noodle and tie off with the stocking ties. Repeat the rolling and turning process, turning and retying the painting 50 times from each side. The painting now has had 400 rollings. You will notice as the rolling progresses, you will be able to tie up the jellyroll a little tighter as the wool felts and consolidates in texture. If any big wrinkles occur, gently but firmly tug at the sides, top and bottom of the painting to straighten the felt which is developing. Even the tugging will assist with felting.
Untie the jellyroll and flip the painting over so it is facing upwards again. Check over the painting. You will see that the painting is starting to felt. Repeat the rolling and turning process another 400 times per front and back (800 rollings). Check on the progress of felting by giving the painting the pinch test. Gently with your thumb and index finger pinch part of the painting. Are the fibres staying in place and look like fabric or are they lifting up off the painting surface? If the fibres are lifting up and look loose, you will have to repeat the rolling process some more. There is no hard and fast rule about the amount of hand rolling required. The pinch test is your guide.
Fulling:
Once the painting fibres look and feel as though they have meshed into a fabric, it is time to full the cloth. Drop the painting into the bucket and go to the sink. Pour the painting and leftover water into the sink. Drain off the excess water. Pick up the painting and flop it into the sink. Each time you let the painting flop, make sure a different part of the painting hits the sink. The shock serves to tighten the felt further into a more substantial finish. I may shock my paintings for up to 40 times. The painting will shrink in size during the fulling process as the fibres tighten and mesh more.
Once the painting has tightened up and looks like fabric and passes the final pinch test, squish out the excess soapy water and drop the painting into a bucket of coolish water. Lift the painting out of the water after it has soaked for a few minutes and gently squish it together. Do not wring, only squish. Discard the soapy water. Drop the painting into a bucket of warmish water and let it sit for a few minutes. Lift the painting out and squish the water out. The water dripping out must be clear. Prepare another quantity of coolish water and add ¼ cup of white vinegar. Add the painting to the final vinegar water rinse and gently press down. Allow the painting to sit for around 10 minutes. Lift the painting out and squish. The vinegar assists to restore the wool pH and the warm/cold water treatment helps further with felting consolidation.
I spin out excess water from my paintings using one of those hand operated washing drums that are sold in caravanning establishments. This tool is probably the cheapest spinner available and works extremely well in my felting work. If you do not have access to one of these, simply squish the painting and set it to dry flat on a spare window fly screen set up on some bricks. Make sure you straighten the painting edges as much as possible before leaving it to dry. Place the painting in the shade and allow it to dry naturally. Once the painting has drained out, you can hang it to dry on the washing line with quite a few pegs. I do this when I am in a hurry.
Preparing for Embroidery:
The dry painting is gently ironed with a cloth over the top. Use the wool setting for this. Iron both sides. I reinforce all my felt paintings before starting the embroidery process with iron on interfacing. The interfacing I use has these tiny shiny glue beads on one side that stick to fabric once they are heated up with the iron. I buy this product by the metre. The beaded side of the interfacing is placed on the back of the felt painting and gently ironed until the interfacing sticks to the felt. Do not consider embroidering on any painting that does not have the lining as this product adds structural integrity to your work.
I mark the back side of my painting with texta lines on the fusible backing to the imaginary framing size. I then match the lines on the fusible backing with some safety pins on the front of the painting. The safety pins in a border on the front of the painting serve as a visual reminder of where the framed border will be. I do this so I do not waste precious embroidery floss in what will end up being hidden by the framer. Also, the framer may have to cut away some of the sides and if he/she cuts into the embroidery that has taken you considerable time and care to sew may be ruined. I only embroider within the lines and safety pin guides. Your framer will most probably appreciate the texta lines on the back of your work as a guide to the finished framing size.
Here you can see a close up of the cottage area. This is where the embroidery will commence. You can also see snipped Angelina sparking through the silk throwster’s waste bushes.
I usually work on the felted “canvas” with dry needle felting tools and extra elements of hand dyed tops before the time consuming embroidery process. Dry felting must occur prior to embroidery and beading as all that needle stabbing will ruin any delicate embroidery floss and will break beads. At this stage, the painting looks quite indistinct but a good embroidery session over the coming week will fix that in a very big way.
Embroidery Embellishments:
The first round of general hand embroidery has been completed (right hand photo). The cottage has been partially outlined to give it definition against the lovely textures in the background. I stitched close to the Mashan locks in the sky to add textural interest and that lovely 3D effect I appreciate.
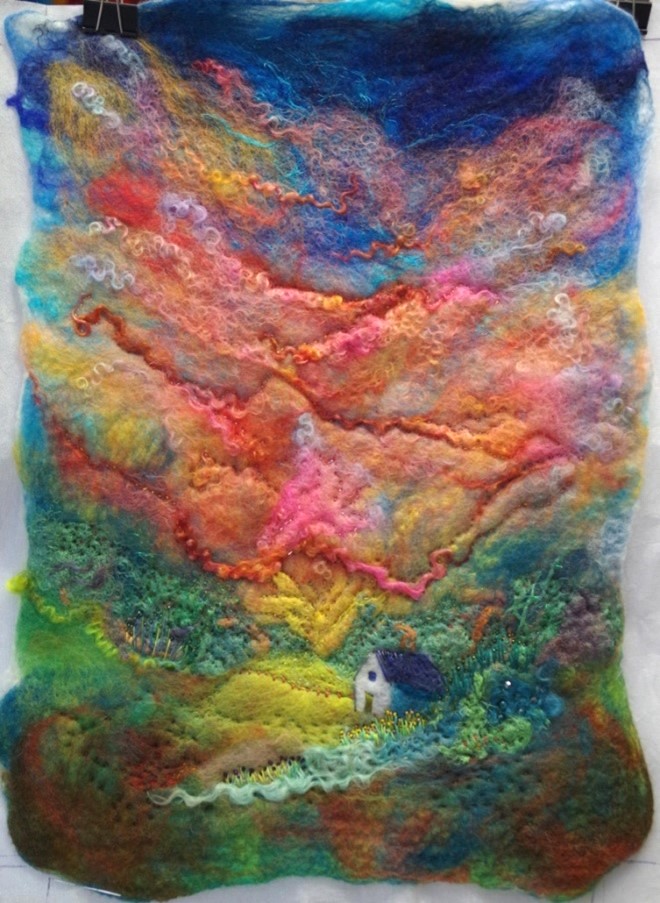
The embroidery will take some time to finish as I never ever hurry this part of the creation. The canvas will sit on my slant board for around a week as I come and go to observe and add some more stitches and bead work as required. The stitching adds a lot of depth to the painting.
The cottage is embedded into the landscape with garden elements. I sewed in some faceted glass coin beads in the bushes closest to the house. One can never have too much sparkle in one’s life, I think.
Here is another close up of the cottage part of the painting. I have added some lines on top of the roof to suggest the late afternoon setting sun in the central part of the painting. A tiny fence line has been added with hints of hay bales. Small Japanese seed beads have been added to the flower stalks and lots of embroidery textures have been sewn in to the shrubbery and general garden. This painting reflects riotous abundance in the landscape.
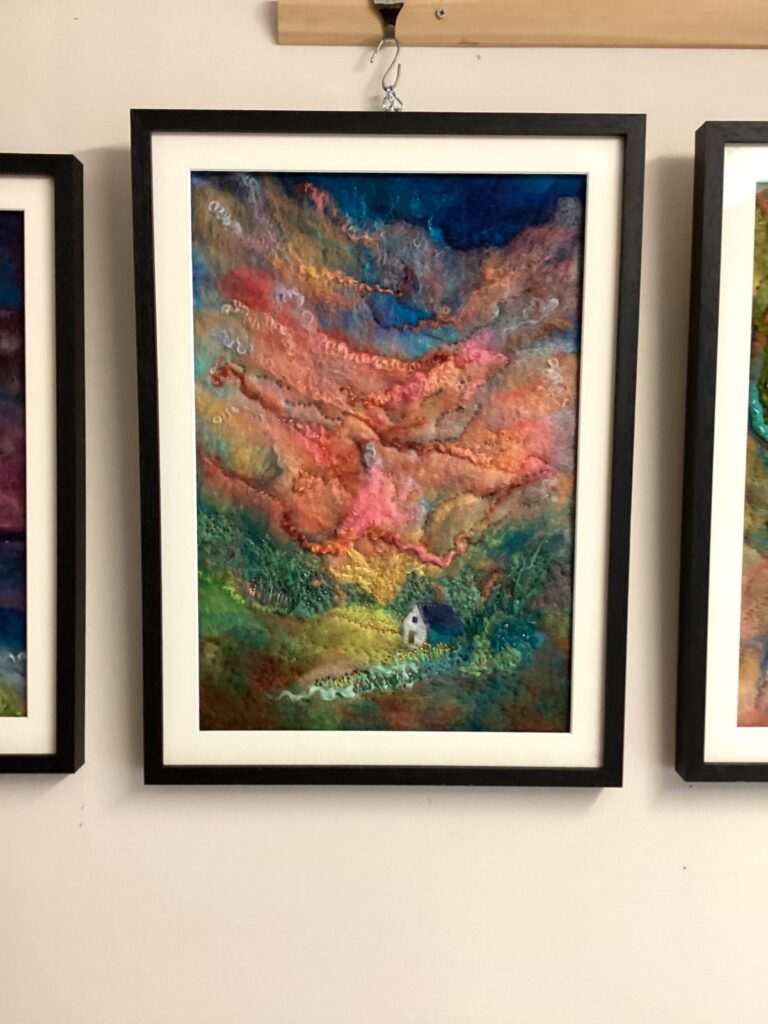
The Finished Painting:
“Gift of the Day” gave me a lot of joy to imagine and create as the cloud structure is very similar to that memorable one I saw during a big drought. The viscose has fractured in the blue part of the sky and adds yet more sparkle.
This painting reinforces my view that we must seize the day and appreciate what we have in this life and who we have to share it with and that we must appreciate simple things in life. I added some semi-precious non-magnetic Hematite into some bushes further away as a symbolic reminder that life itself is a gem.
“Gift of the Day” – Reminds me of a time when we had a full paddock of baled hay and a lovely late summer sunset to enjoy amongst the abundance of the garden. A hard life by a halcyon one.
The multiple wispy layers of different coloured wools permit bottom layers of colour to seep through, adding depth to the painting. The sky is jumping with colour, form and texture which are my hallmarks.
Most of my paintings are framed up with non-reflective, UV resistant glass as I always seek to have good archival quality finish in my works. I always ask my framer to leave a space between the wool and the glass. “Box” style frames are ideal for this type of art as they permit the wool to breathe and not come into contact with the glass at all. Most framers will not have heard of felt paintings so passing on advice about what you want in the finished framing process will assist them greatly. Remember the three enemies of such works are moisture, light and dust. Never hang your works in direct sunlight or a damp part of the house either. After all, art is forever, is it not?
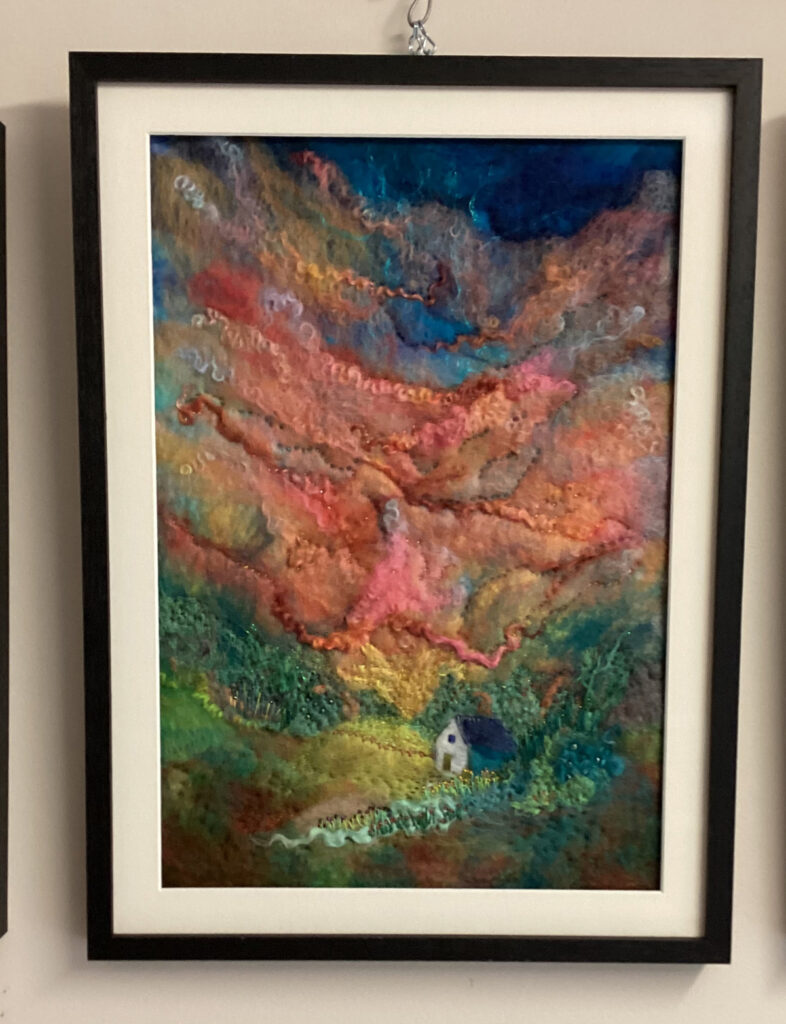
“Gift of the Day” is available from my studio for $975. Courier costs extra. Painting size 47 cms x 52cms. Professionally mounted and framed. Non reflective glass. A unique painting.
I also have another WordPress site where I chat about life matters, animals and the natural world here: www.janebaridesign.wordpress.com